Hi-Opt I is a more advanced system than Hi-Lo. In this project, Hi-Opt I uses a playing count, ace side count, and adjusted betting / insurance true counts.
The point of Hi-Opt I is not just swapping the Hi-Lo card values. It separates the count used for playing decisions from the count used for betting and insurance. Playing decisions use the Playing TC from the raw Hi-Opt I running count, while betting and insurance also adjust for the ace deficit so the value of aces for blackjack and betting is reflected.
Hi-Opt I Card Values
Card
Count
3-6
+1
2、7、8、9
0
10、J、Q、K
-1
A
0, tracked separately with ace side count
Count Metrics
In the app's Hi-Opt I mode, the screen and strategy logic use the metrics below. The easiest pair to confuse is Playing TC and Betting TC: the former is used for playing decisions such as hit, stand, double, split, and surrender; the latter is used for bet sizing.
Metric
Meaning
Formula / Note
Running Count
Ace-neutral main count
A = 0
Playing TC
Used for playing decisions
RC / decksRemaining
Ace Seen
Track aces seen separately
Side count
Ace Deficit
How many fewer aces have appeared than expected
usedCards / 13 - aceSeen
Adjusted RC
RC adjusted by ace deficit and k
RC + k × Ace Deficit
Betting TC
Used for betting
Adjusted RC / decksRemaining
Insurance TC
Used for insurance
Currently same as betting TC
These tables follow the current project's Hi-Opt I core index spec, not a universal full-index set. The ace adjustment parameter in Game Settings is the k in the formula, and it affects Adjusted RC, Betting TC, and Insurance TC.
Core Deviations
The app's core index spec includes insurance, surrender, hard hands, 10,10 splits, and some doubles. Compared with Hi-Lo, Hi-Opt I is more precise, but it also adds an ace side count and true-count adjustments, so actual results depend on Side A estimation, the betting threshold k, and the use case.
Insurance
Situation
Basic Strategy
Deviation
Dealer A
No Insurance
Take insurance when Insurance TC >= +3
Surrender Deviations
Player Hand
Dealer
Deviation
15
A
Surrender at Playing TC >= +1 for H17; Playing TC >= +2 for S17
15
9
Surrender when Playing TC >= +2
14
10
Surrender when Playing TC >= +3
Hard Hand Deviations
Player Hand
Dealer
Basic Strategy
Deviation
16
10
H / R
Stand when surrender is unavailable and Playing TC >= 0
15
10
H / R
Stand when surrender is unavailable and Playing TC >= +4
16
9
Hit
Stand when Playing TC >= +5
13
2
Hit
Stand when Playing TC >= -1
13
3
Hit
Stand when Playing TC >= -2
12
2
Hit
Stand when Playing TC >= +3
12
3
Hit
Stand when Playing TC >= +2
12
4
Stand
Hit when Playing TC < 0
12
5
Stand
Hit when Playing TC < -2
12
6
Stand
Hit when Playing TC < -1
Pair Split Deviations
Pair
Dealer
Basic Strategy
Deviation
10,10
5
Stand
Split when Playing TC >= +5
10,10
6
Stand
Split when Playing TC >= +5
Double Deviations
Player Hand
Dealer
Deviation
11
A
Double when Playing TC >= 0
10
10
Double when Playing TC >= +4
10
A
Double when Playing TC >= +4
9
2
Double when Playing TC >= +1
9
7
Double when Playing TC >= +3
App Simulation Stats
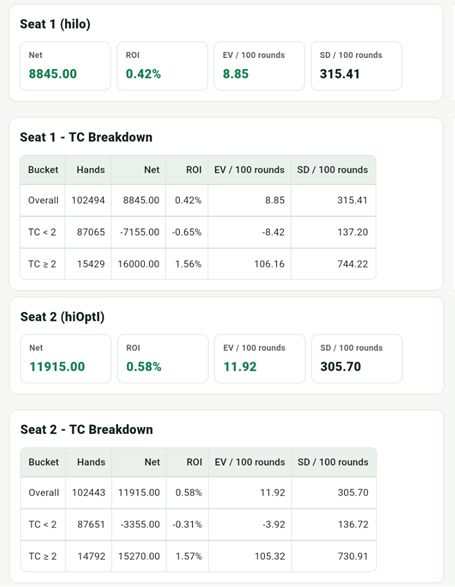
Below is a 100,000-round comparison of Hi-Lo and Hi-Opt I, both using Bet Ramp 2/4/6/8/10. Hi-Opt I uses Side A k = 1.0 for the Betting TC adjustment. In this result, Hi-Lo achieves EV / 100 of 8.85 and SD / 100 of 315.41, while Hi-Opt I achieves EV / 100 of 11.92 and SD / 100 of 305.70. Hi-Opt I shows higher EV with slightly lower SD / 100 in this run; overall, the gap is not as large as it may seem.
Hi-Lo vs Hi-Opt I, 100,000-round simulation result
Interpret this kind of comparison with some flexibility. Hi-Opt I is not just a direct card-value swap against Hi-Lo, because it uses an ace side count and adjusts betting / insurance true count based on different k values. A single simulation can show direction, but it should not be used alone to decide which system is absolutely better.
Hi-Opt I requires more discipline and tracking ability than Hi-Lo. It is better to stabilize basic strategy and Hi-Lo before moving to Hi-Opt I.